How to Publish Open Source Java Libraries to Maven Central
I have recently published a small Java library on Maven Central: written in plain Java, built with Gradle using Gradle’s Kotlin DSL, integrated using GitHub actions and published to Maven Central using Gradle’s “maven-publish” plugin.
Here are simple step-by-step instructions on how to reproduce and automate the process.
Sonatype OSS Project Setup

You will need to open a ticket with Sonatype here and ask them for an open source project.
You will need to sign up for an account if you don’t already have one.
Sonatype are very quick to respond, friendly and very helpful. They’ll guide you to the process, just follow their guidelines.
If the maven group you choose matches an internet domain, Sonatype will ask you to complete a DNS challenge to prove that you own it.
You can see the ticket I opened for my library and the exchanges I had with Sonatype here.
Sonatype user name and password will need to be configured as CI secrets to be passed along to your build when publishing artifacts.
Generate a PGP Key Pair

I generated my key pair using the Gnu Privacy Guard distribution which can be downloaded here. After generating the keys you will need to export both the private key and the public key in ASCII armored format.
You should store the keys and the related password somewhere safe — I put them in a secure note in my 1Password vault.
You will also have to securely store your private key and key password in your CI infrastructure and pass it along to your build.
The public key needs to be uploaded to a few well known public key servers. Sonatype will look it up when you promote your artifacts and verify that nobody has tempered with them. I have uploaded my public key to:
Gradle Build
In order for your library to be accepted to the Central Repository, your gradle build must:
- produce JavaDoc and sources Jar files along the main library Jar file
- sign artifacts using your private PGP key
- configure the publishing task and set up your POM
- upload signed Jar files to the staging repository
Apply required plugins to your build.gradle.kts file
You may of course apply other plugins to your build but “maven-publish” and “signing” are the important ones.
Define Gradle tasks to build Sources and JavaDoc jar files
The code here is quite straightforward: we define “Jar” type tasks and we instruct gradle how to put in those jar files and how to name them.
In lines 3 and 8 we ask Gradle to build Jar files using Java source code files in the project and the output of the javadoc task, respectively.
The “archiveClassifier” attribute set in lines 2 and 7 is a string Gradle will use to derive the name of the jar file from the name of the main library jar. For example, if the library jar file is mylib.jar, the jar holding source codefiles will be named “mylib-sources.jar” and jar containing the libraries JavaDoc files will be named “mylib-javadoc.jar”
Set up Maven publications and your project’s POM
You will need the code block bellow to set up your your maven publication:
This is pretty big so lets take it line by line:
In lines 1 and 2 we get the user name and password needed to publish to Sonatype repositories. You will get these credentials when you will create your Sonatype account.
You will pass these to your build using the “-P” command line switch: “./gradlew … -PMAVEN_UPLOAD_USER=username -PMAVEN_UPLOAD_PWD=password”
Next we have the “publishing” block and its two sections: “repositories” and “publications”.
The “repositories” section (lines 5 to 15) defines where we publish artifacts while the “publications” sections (lines 17 to 48) defines which artifacts we publish related metadata (the Project Object Model, or POM)
Target Repositories
Starting with line 7 we define the “MavenCentral” repository. If you look carefully you will notice we are actually defining two repositories, one for publishing snapshot versions of our artifacts (line 8) and one for publishing release versions (line 9). The publication will be routed dynamically at run-time to the proper URL based on your project’s version (line 10).
Last, in the credentials section (lines 11 to 14), we instruct the “maven-publish” plugin to use the user name and password we mentioned before to connect to either one of the Sonatype repositories.
Publications
Starting with line 18 we create a publication named “MavenJava” and we tell it which artifacts make up this publication. In our case it’s the main library, source code and JavaDoc Jar files.
Starting with line 23 we define the project’s POM — basically metadata for the artifact you publish. This will allow MavenCentral and other repositories to index, search and properly present your library on the repository user interface.
Configure Artifact Signing
To have Gradle sign the artifacts before publishing, you need to add the following code block to your build file:
It is important to add it after the “publishing” block we have described earlier, in order for it to be able to find the correct publication artifacts to sign.
In lines 1 and 2 we use the same mechanism described earlier to get hold of the PGP private key and matching password you want to sign the artifacts with. Private key is expected to be in “ASCII armored” format.
Just like with repository credentials, the private key and associated password will be passed to Gradle using “-P” command line switches.
GitHub Actions: Continuous Integration Pipeline
Since my open source project is hosted on GitHub I used GitHub Actions to build, test and publish.
Adding GitHub actions to your project is quite easy, all you need to do is follow the intuitive UI and adapt a YAML file that is generated for you in your project, in the “.github/workflows” folder. In my case the YAML file looks like this:
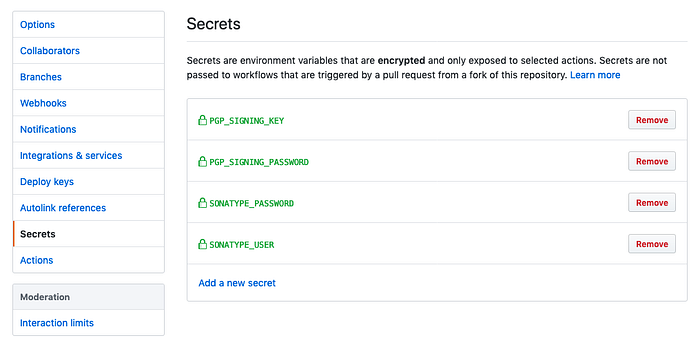
You will notice in line 17 I pass Sonatype account credentials and signing key/password to Gradle using “-P” command line switches. The values passed in there are GitHub secrets.
You can define these secrets in your github repository “Settings” tab. Make sure the name of the secret in “Settings” matches the name of the secrets in your GitHub actions file.
And this is it, you’re all set. Each time you push to your repository you will build and publish artifacts. If your project version ends in “-SNAPSHOT” you will publish to the snapshots repository, otherwise you will publish to the staging repository.
Releasing to Maven Central
When you publish a non-snapshot version of your artifact, Sonatype will create a dedicated staging repository for that publication.
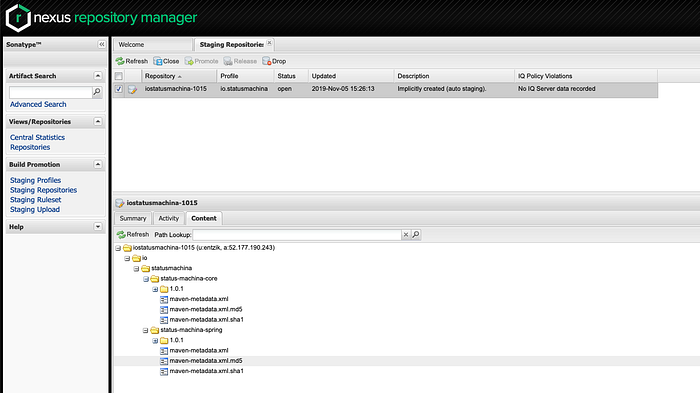
To release it to Maven Central you will have to log in to https://oss.sonatype.org and click on the “Staging Repositories” menu item in the left navigation bar. Here you’ll get a chance to inspect your publication: make sure the version is right, POM information is correct and so on.
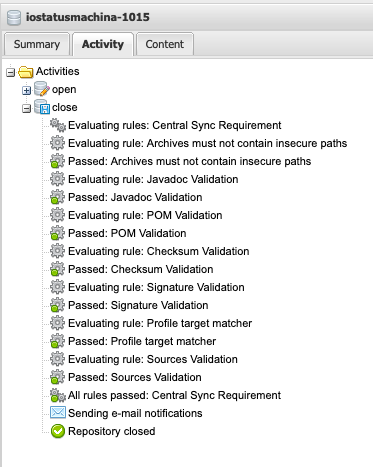
If you’re happy with the state of the artifact you must “close” the staging repository by clicking on the “close” button in the toolbar. When you do so Sonatype will go through a check list to verify your publication matches Maven Central requirements.
If you get errors you need to fix them and publish again.
If everything checks out, you can select the staging repository again and click the “Release” button. This will copy your artifact to the “Release” repository from where they will be synced to Maven Central.
Synchronizing to maven Central takes about 20m in my experience but sometimes more. The first release always takes longer — mine had taken almost 24 hours. Don’t forget to comment on the JIRA ticket when you release for the first time so that Sonatype can activate the sync process.
Well, that’s it. Hope this was helpful.